
More Video Views than the PEOPLE in Batavia
Built primarily by interns, these 20 videos with 58,188 views for a town with 26,275 people equals 221% saturation.
*As of 7 July 2025

The ask was to raise awareness for both drivers and kids doing their summer things in Batavia, to be more present and careful at intersections where kids will be.
An intern, myself and the city communications director brought donuts to a 7th grade speech students class and asked them to tell us their favorite things to do in Batavia in the summer as well as any close traffic calls they experienced. Their teacher, Matt would finish each interview with a call to action, to watch out for these kids while their doing their amazing kid things.
Our intern did the interviewing and created a much more accessible ear to their stories than any of us adults could have done.
Another intern edited the interviews while another team of interns filmed b-roll with a 360 camera of kids on scooters and bikes at all the locations the kids mentioned in the interviews so that viewers could piece the traffic + pedestrian interactions with the kids stories.
From there, the interviews, b-rolls, music, subtitles and CTAs we’re pieced together, published and installed into a landing page where the city downloaded the videos and posted to their social media — receiving record views.
The cost was $100 per video.
We’re looking for best fit projects like these for our interns: See Below
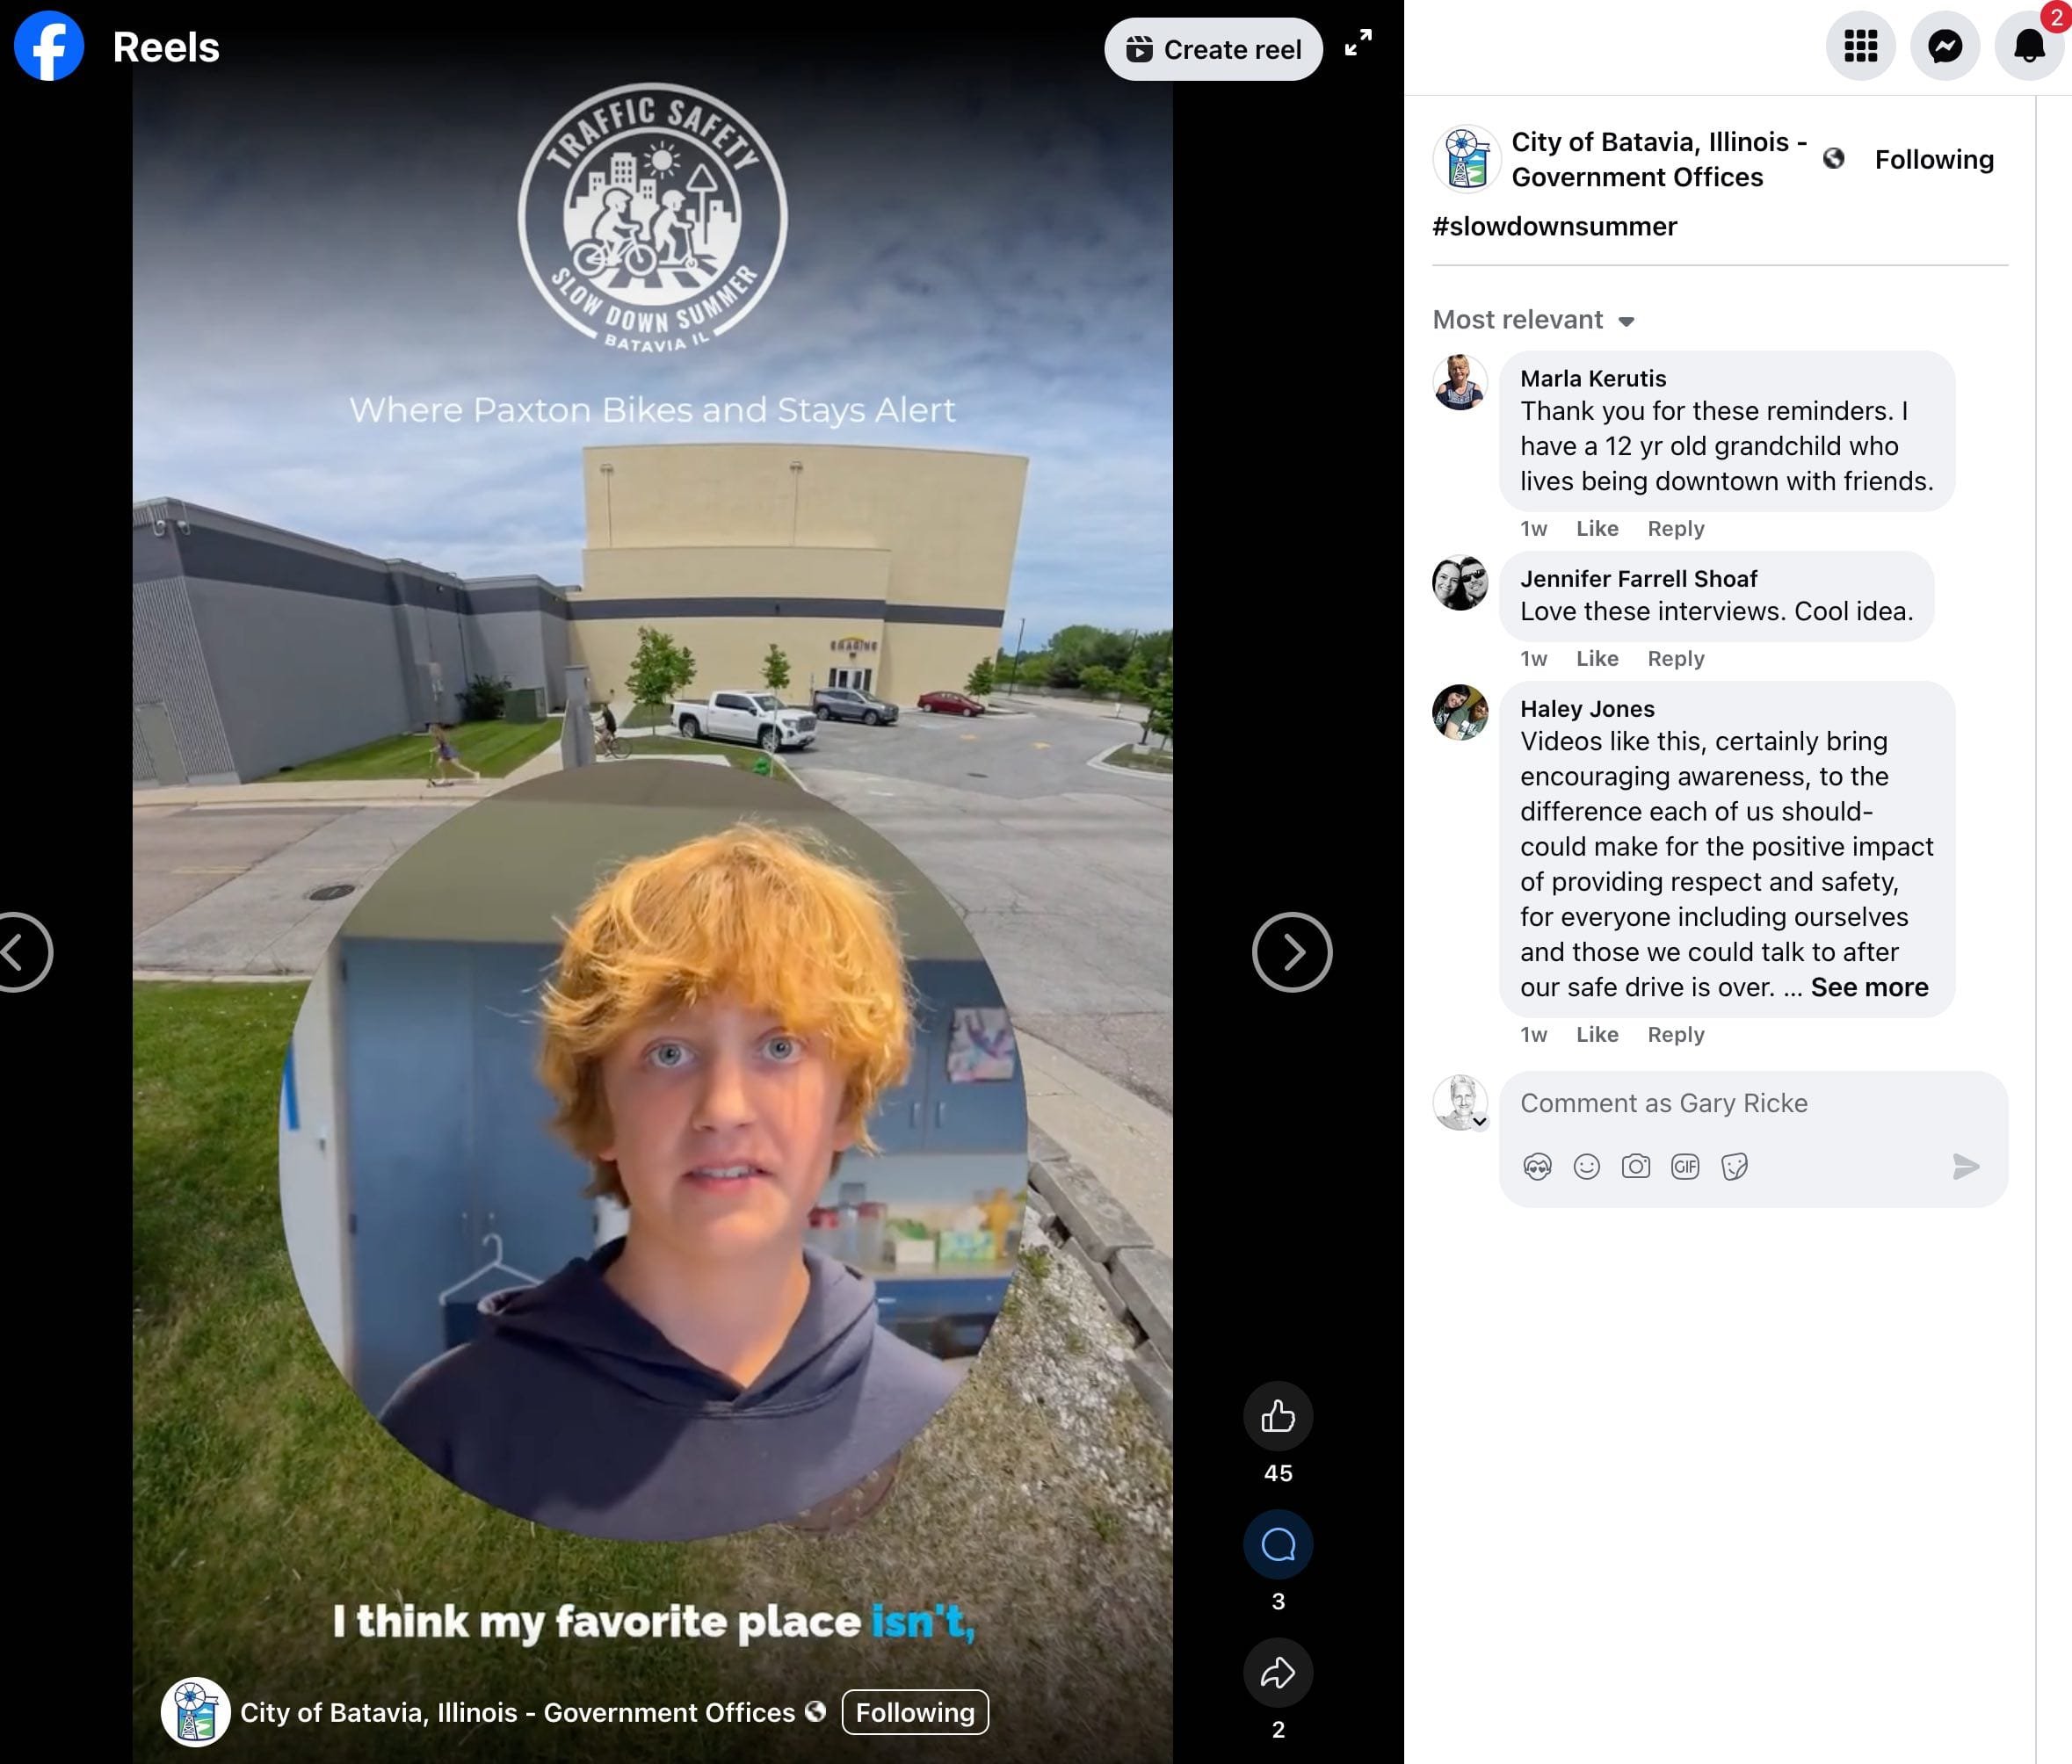
Below: Some of the comments


These are the tutorials I created for the Interns to guide the editing and production.
The Template to Follow

Length: 15 Minutes, 9 seconds
This is a highly practical, hands-on walkthrough for producing consistent and professional-grade videos. You will walk away knowing exactly how to use the Kapwing editing template, what to check for quality control, and how to ensure the final product is polished and ready for publication without further revisions.
-
1. Basic Template Navigation & Key Editing Practices
How to open, inspect, and adjust the base Kapu video editing template.
Understanding visual elements like snap alignment, track resizing, and gap detection in the timeline.
Adjusting and ensuring visual consistency in clip duration and transitions.
2. Cropping & Framing Interview Subjects
Applying a 1:1 crop ratio to frame subjects’ faces closely to capture emotional expression.
Managing layer visibility (e.g., bringing subjects to the front) for easier resizing and alignment.
Using visual guides like center lines to maintain composition consistency across multiple videos.
3. Subtitling Process
Generating subtitles with the built-in auto-subtitle tool.
Using QuillBot Punctuation Checker to polish subtitle text for accuracy and readability.
Tips for reviewing, editing, and perfecting subtitle timing and punctuation.
4. Adding & Adjusting B-Roll Footage
Selecting relevant B-roll (e.g., clips of the quarry, library) to match the subject's dialogue.
Adjusting playback speed (slow-motion) to better match timing or improve visual impact.
Muting B-roll audio to avoid conflicting with narration.
5. Creating a Compelling Call to Action (CTA)
Crafting a short, effective CTA inspired by script cues or presenter statements.
Using only first names for personalization while maintaining privacy.
6. Title & Branding Elements
Creating a short, catchy title that includes the subject’s name.
Using a background fade and top title overlay for clear branding and message retention.
Understanding how titles work both in the video and as thumbnails or preview elements for web embedding.
7. Finalization & Exporting
How to cleanly splice music tracks and control audio levels based on voiceover presence.
Best practices for version control (using the version history feature).
Stressing the importance of perfection in every element—cut, subtitle, audio, and timing—before marking the edit complete.
Advanced Video Editing

This video walkthrough showcases an editorial deep-dive into the traffic safety story titled “Martellus Lizard.”
I show you the creative and technical editing decisions made to enhance the story’s emotional appeal, improve audio quality, and ensure engaging visual presentation. It’s an advanced tutorial geared toward an understanding of both story-driven enhancements and professional post-production fixes.
-
1. Creative Story Hooking and Structuring
The video opens with an unusual and compelling quote (“This lizard almost bit my dad’s finger off”) to hook the audience, a technique inspired by TikTok pacing.
The narrative is later looped back to the start of the story for cohesive storytelling, reinforcing the lizard anecdote as a thematic device tied into the broader traffic safety message.
2. B-Roll & Visual Enhancements
Integration of both a static image and dynamic video clip of the lizard (from a YouTube source) to deepen the viewer’s connection.
A Photoshop technique is used to generate vertical (9:16) framing by filling the background above and below the horizontal lizard shot—eliminating black bars and making it more mobile-friendly.
Multiple background fill versions were created for consistency across different clips.
3. Audio Quality Improvements
Editor noticed drop-offs in audio (especially during Micah’s lines) due to suspected iOS conflicts.
Rather than ignoring the issue, the editor used 11 Labs to clone Micah’s voice and regenerate missing lines, ensuring seamless voice continuity without impacting student dialogue.
Voice enhancement tools were also selectively applied to Matt’s voice clips—turning on/off enhancement per segment depending on clarity and distortion.
4. Title & Branding Accuracy
Emphasizes the importance of capitalizing titles properly using a title case converter to maintain editorial standards.
Titles are not only for clarity but also serve as thumbnails and metadata for embedding the video on websites or social platforms.
🧰 Additional Enhancements and Fine Touches
🎉 Birthday Moment Additions
When Matt mentions it’s Mateo’s birthday, the editor adds:
A cheer audio clip from Epidemic Sound for celebratory emphasis.
A fun squirrel GIF overlay to create a joyful moment.
A modified end caption: “Let’s make sure Marta has many, many more birthdays,” tying safety messaging to the story’s emotional core.
🔊 Why Audio Matters
Emphasizes that audio clarity is more important than visuals, because the audience is more likely to disengage if audio is uncomfortable—even slightly.
The goal is to eliminate friction or distraction, making the viewer experience smooth and enjoyable.
🏁 Takeaway
Viewers of this video will gain:
A practical understanding of how to polish a video story using advanced tools (Photoshop, 11 Labs, subtitle tweaking).
Strategies for enhancing viewer engagement through humor, surprise hooks, and emotional beats.
Real-world solutions to common issues like poor framing, missing audio, and inconsistent voice quality.
Insight into the editor’s mindset: perfectionism in service of storytelling and impact.
This is a masterclass in editorial craftsmanship, balancing tech-savvy fixes with narrative flair, perfect for any content team refining youth-centered or community safety videos.
Installing Videos to Landing Page

This video is a comprehensive tutorial for uploading edited videos to a landing page, specifically via Vimeo and Squarespace. I guide you through the process of exporting, uploading, thumbnail creation, post setup, and how to properly replace previously uploaded videos while maintaining consistency and quality.
-
1. Final Export Preparation from the Editor
Export the final video in MP4 format, 1080p, and highest quality settings.
Confirm the export by checking the rendered file in the “exports” list.
Watch the entire video playback before moving forward, as the exported version can differ slightly from the editor preview.
2. Uploading to Vimeo
Use the Riverbank Vimeo account to host the video.
Drag and drop the exported video into Vimeo and wait for full processing—this includes waiting for the 1080p HD version to become available under “Video File Links.”
Vimeo is used for hosting due to better playback and embedding functionality compared to Squarespace.
🧷 Thumbnail Selection and Optimization
Once Vimeo finishes processing:
Select an optimal thumbnail frame directly from the video: prioritize shots with subject smiling and title visible.
Avoid frames where eyes are closed or text is missing.
Download the Vimeo-generated thumbnail—it’s the perfect size and quality for the site.
Replace older or unused thumbnails for better asset management.
🖥️ Integrating with Squarespace
Log in to the Riverbank account on Squarespace.
Navigate to:
City of Batavia Videos page (live content)
Staging page (for review/testing)
Duplicate a blog entry as a template, edit the title and update:
Thumbnail image
Vimeo video source URL (from “Video File Links”)
Post slug (URL) – avoiding apostrophes
Ensure the post is properly tagged (e.g., “Summer Traffic Safety”), published, and saved.
🔁 Replacing an Existing Video
If changes are made post-installation:
Use Vimeo’s "Replace Video" feature to upload the new version.
Vimeo retains the same URL and metadata, simplifying updates.
Recreate and replace the thumbnail using the same process.
Back in Squarespace:
Just replace the thumbnail (no need to update the video URL again).
Test the page to verify the new video and thumbnail display correctly.
🧠 Important Tips and Practices
Consistency: Ensure all videos use the same layout and styling (template standardization).
Quality Control: Double-check every element—video, thumbnail, URL, tags—before publishing.
Efficiency: Use staging pages for internal reviews before making content live.
Visual Harmony: Thumbnails and video layouts should be uniform across all entries for professional presentation.
🏁 Takeaway
This video serves as a hands-on guide for website video deployment. Viewers will learn how to:
Export and optimize videos
Upload to Vimeo and configure embed settings
Set thumbnails that reflect the video and draw clicks
Publish and test posts in Squarespace with proper tagging and formatting
Seamlessly replace existing content without breaking the layout
This tutorial ensures a professional, consistent, and scalable video publishing workflow.

Looking for an Intern Driven Video Package?
We’re looking for best fit companies in Batavia to try a few $1,500 for 15 videos projects. We show up to your location, spend 1-2 hours capturing short conversational video interviews, shoot some b-roll and then deliver the all the videos (like these) in 1-2 weeks.
Please note, in order to deliver this many videos within this price range, producing this kind of engagement, our structure and process is very specific. Any deviations requires substantial increases in budget.